AMD Graphics Cards Discussion Thread
- Useful Downloads
- Crimson Drivers Guide
- Overclocking Guide
- General Discussion of AMD GPU's
- Useful Downloads
- Crimson Drivers Guide
- Overclocking Guide
- General Discussion of AMD GPU's
Useful Downloads and Links
Latest AMD Drivers - http://support.amd.com/en-us/download
- Select the appropriate Operating System and under the category for your GPU or use the Auto Detect tool if you're unsure
- AMD calls the latest drivers "Hotfixes". If you're looking for up to date support for new games you'll want to go with the hotfix. These tend to be updated a couple times a month since the switch to Crimson. Check the Release Notes tab to see what has been changed in each version. The hotfix drivers are also considered beta.
MSI Afterburner - https://gaming.msi.com/features/afterburner
- This is my preferred overclocking software and has a lot of features, most of which I don't use
- Feel free to explore the options and features as I won't cover much more than overclocking later on
- Provides detailed info about your GPU, compatible with all Nvidia and Intel also
DisplayDriverUninstaller - http://www.guru3d.com/files-details/display-driver-uninstaller-download.html
- DDU is a good tool for performing a clean removal and uninstall of graphics cards drivers. It's compatible with AMD, Nvidia, and Intel GPU's.
- Generally speaking it's safe to install AMD drivers over the previous version without the need for DDU every time. However if you have any potential driver problems this is the first place to start. Crimson should automatically update drivers, but so far it seems inconsistent at keeping mine up to date to the latest hotfix.
- @spirit Made an excellent guide on performing a clean install of your drivers using DisplayDriverUninstaller
http://www.computerforum.com/thread...all-graphics-drivers-amd-nvidia-intel.230370/
Furmark - http://www.ozone3d.net/benchmarks/fur/
- Quick and easy benchmark for graphics card testing. Good to use for testing various clocks
- This is a bit more intensive than Furmark and can be used to stress test your overclocks. There are numerous other benchmarking tools out there, but these are the two I use mainly.
Crimson Drivers and Radeon Settings
AMD has pushed forward their new driver suite called Crimson Drivers to replace the decrepit and dying Catalyst Drivers in preparation for the launching of Polaris later this year. While maybe not all that applicable to many of you sporting Nvidia cards, I figured we could use a general guide/discussion thread for AMD cards as they have much less information readily available, particularly with the new drivers. I've done quite a bit of tweaking and overclocking with my AMD cards and have gotten pretty familiar with the new driver suite and how to get the most from you GPU.
I hope some of you may find this helpful and I'll do my best to keep it up to date. (currently under construction, pictures coming). Also feel free to make suggestions if you have anything to add.
After getting your drivers installed from the links above and performing a system reboot, you will be able to access Radeon Settings by right clicking on your desktop. The new interface is quite a bit different than Catalyst and takes some getting used to. Thankfully it launches a lot quicker and is pretty quick to get around once you're acclimated.
The home button in the bottom left will take you to the main page. Within most tabs there is a "more..." button that will explain what the various settings do. There is also an "Additional Settings" button that will pull up a window with... additional settings! Unfortunately this looks an awful lot like Catalyst but can give you a bit more control over your screens.
- The System tab will give you details about your computer, driver versions, and GPU.
- The Eyefinity tab will allow you to configure your Eyefinity panels should you wish to do that. I have no experience with that unfortunately so hopefully you can explore that yourself.

- The Display tab shows you your currently connected monitors. Here you can enable Virtual Super Resolution, GPU Scaling, and Scaling Mode.
- The Video tab lets you change the video settings of your display and is fairly straightforward.
- The Updates tab across the bottom lets you check for driver updates
- The Preferences tab gives you a few more options for Radeon Settings itself, including Restore to Factory Defaults. You can also disable the banner advertisements for a cleaner look.
- The Gaming tab is where things get interesting and where a lot of functionality comes in that was missing from Catalyst.
Note: For these settings to take effect you must change them before launching the game. If you change the settings while in game you'll need to restart it. I've sometimes had the settings not take properly until I rebooted my whole machine.
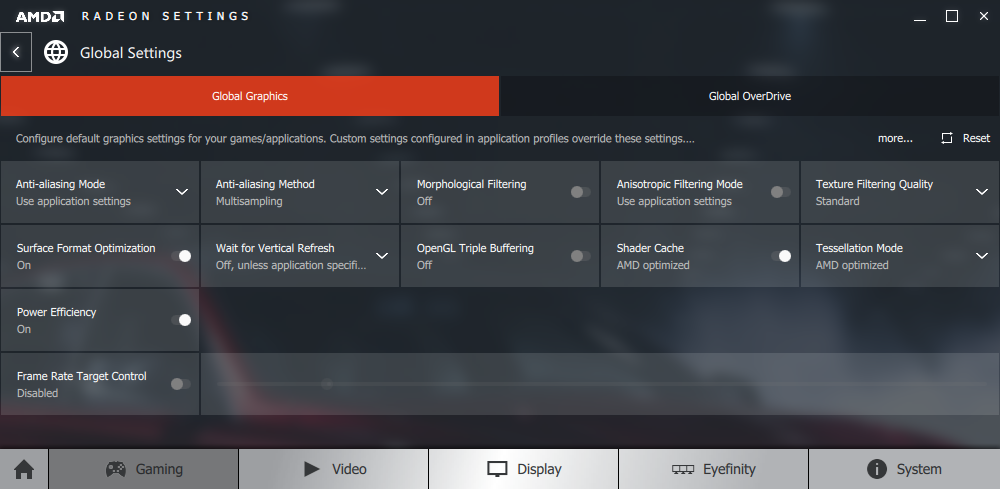
Crimson will automatically attempt to identify your installed games and list them here. You can use the "Add" button in the top right to specify any program you want though if it doesn't show up here. You also have a "Global Settings" profile. This is what will be active when running fullscreen maximized applications that don't already have an enabled profile. From what I can tell, these settings don't apply if running in Windowed or Borderless Fullscreen Mode.
Profile Graphics
By default most things will be off or set to application settings. I would leave these settings alone for your global settings and change what's needed on a game to game basis. Feel free to experiment with them, though. These are all well explained by clicking "more" but I'll highlight a few things I make use of.
- Frame Rate Control
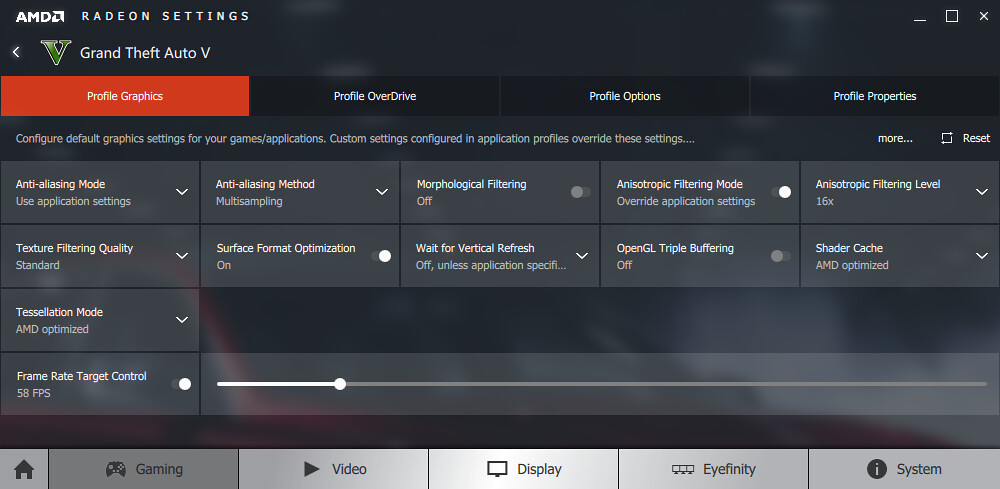
Generally you want to keep your framerate at or below the refresh rate of your monitor to reduce screen tearing, which looks like horizontal rips in the image as two different frames are rendered at the same time. Some games are more susceptible to others than this. While there isn't anything wrong with running your framerate over your refresh rate, I generally find it to be a waste of electricity and heat. I keep a my global settings to a target of 57. If I set it at 60 I still get a bit of tearing. When running benchmarks you'll want this off so you can get accurate results.
- V-Sync
This is also used to combat screen tearing by trying to sync your framerate to your refresh rate rather than simply capping. It works well but also cause potential problems. Some games will get pretty bad input lag if VSync is enabled and might make it feel stuttery. Some games like GTA V will also suffer framerate drop below what you would have with it off. My rule of thumb is VSync off in all my games and a Frame Rate Control on. Some games like Fallout 4 lock Vsync on, but with some ini file tweaks and Crimson drivers I'm able to disable it and cap my framerate. This gives me much smoother performance. Generally I disable V-Sync within the game as the override doesn't always work.
- Anisotropic Filtering
AF increases the quality of repeated textures at distance and at an angle and is pretty light on performance. Some games have better implementation of AF than others, which might prompt you to force it with Crimson. GTA V has pretty bad built in AF that makes road surfaces a little bit away quite blurry. By overriding the built in AF and setting it x16 in Crimson I get a dramatic increase in visuals at no performance difference. Similar settings like Texture Filtering and AntiAliasing will vary game to game, so feel free to research and experiment.
- Tessellation Mode
This is another setting worth looking at as it can make a dramatic difference in some games, particularly if they make use of Nvidia GameWorks. AMD cards are notorious for poor tessellation performance due to architectural design. Mysteriously and convenient for them, Nvidia started using a whole lot of tessellation features in their GameWorks technologies such as HairWorks in Witcher 3 and God Rays in Fallout 4. While the results can look very good, they run noticeably worse on AMD hardware in comparison to similar Nvidia cards. You can combat this with varying success by overriding the tessellation settings of these games and setting it to x16 or x32. With HairWorks enabled in Witcher 3 I took a massive 10-15 FPS performance hit for some fuzzy hair on Geralt's head. By setting my tessellation at x16 I was able to cut the loss to maybe 5FPS with no perceptible change in quality. Fallout 4 also benefits from this due to God Rays using tesselation.
- Power Efficiency
If you don't care about your electric bill and/or the planet just disable this. I got a lot of throttling when I started to overclock.
This is a new setting as of 16.3 that is on by default and only available on more recent 300 series cards and up. The core clock of your GPU will dynamically change in game in order to balance power consumption with performance. Currently this implementation can get a bit aggressive and downclock your card more than you would want and give you drops in performance. Disabling this may help if you're experiencing variations in clock speeds and performance. In the Overclocking section below I'll address another way to get around this.
This is what I have setup for GTA V for example.
Overclocking Guide and Tips
In this section I'll walk you through a fairly quick explanation of overclocking your AMD GPU to get a little extra free performance. It's fairly safe to say that most steps involved here will translate to Nvidia cards as well.
Disclaimer: I take no responsibility for any damage you may inflict upon your computer or yourself in the process of doing this. I've done a good amount of overclocking and can assure you it's safe if done correctly, but proceed at your own risk. Make sure your power supply is of good quality and adequate to provide enough power for your machine.
I will write this guide with screenshots of MSI Afterburner and Radeon Settings in Crimson Drivers side by side. The process is relatively the same and I'll point out any differences as we go. While Radeon Settings definitely will work for some mild to moderate overclocking, I still would suggest checking out Afterburner if you're looking for more features and stability.
Getting Ready to Overclock
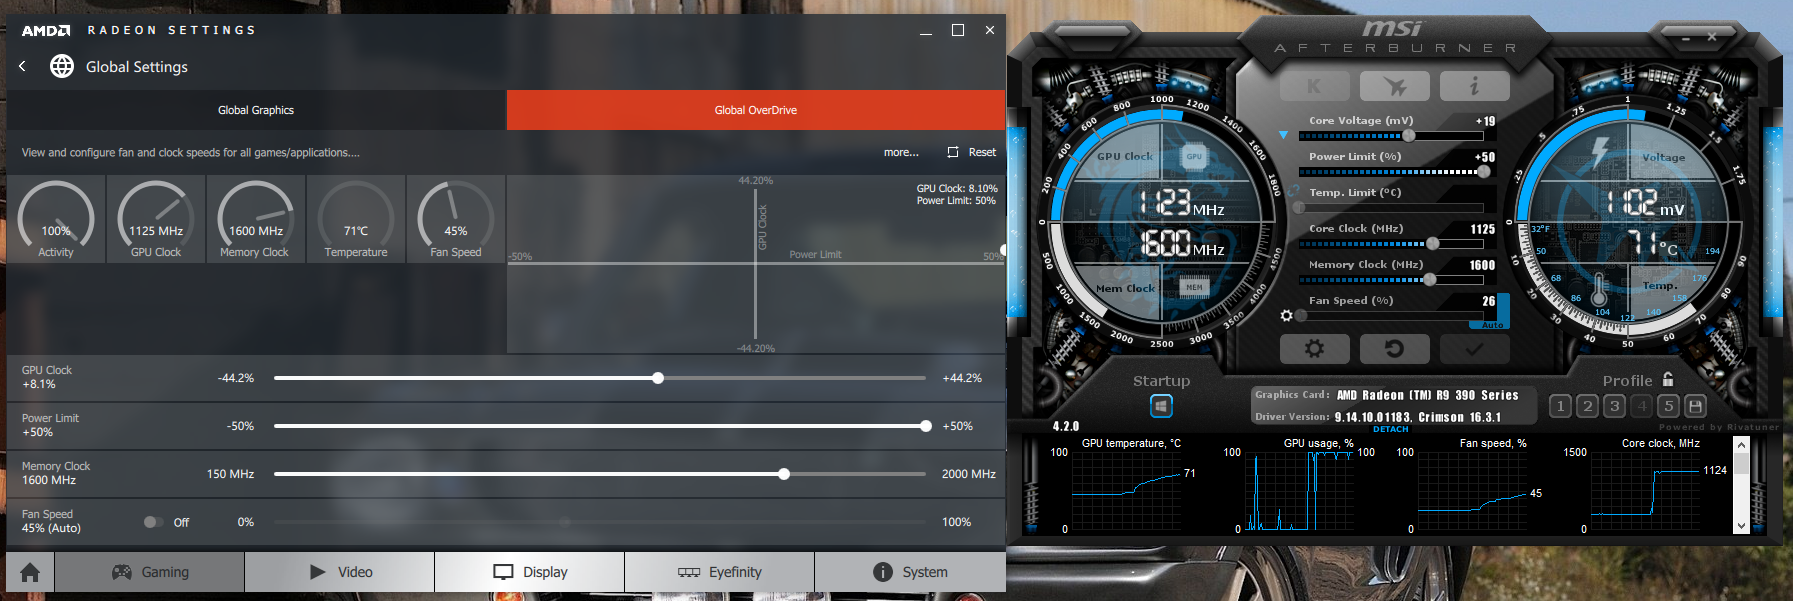
Start off by making sure you're on the latest drivers from above and using the most recent version of Afterburner. Here I have both set up side by side at stock clocks and ready for overclocking.
SET THE POWER LIMIT SLIDER ALL THE WAY TO THE RIGHT ON EITHER AFTERBURNER OR RADEON SETTINGS. This is important as it will reduce clockspeed throttling. It has no impact on your temperatures and simply gives your card the permission to pull more power as needed. This should be done regardless on whether or not you overclock in order to prevent downclocking. ALSO DISABLE POWER EFFICIENCY FROM ABOVE. Radeon Settings
- Enter the Gaming Tab and select Global Settings. This will set your card to be overclocked for all games. You can set specific overclocks for each game if you prefer.
- Across the top select Global Overdrive. A disclaimer will likely come up, read and accept it.
- Radeon Settings UI is pretty straight forward. I'd ignore the graph in the top right and just use the sliders if I were you. I do find it annoying you can't manually type in your clock speeds, but if you click on it and use your arrow keys you can fine tune the adjustments.
- For some strange reason, the GPU clock for me is listed as a percentage rather than a clock speed. This may or may not be the case with you. It doesn't matter, you'll just have to use GPU-Z or similar to find out your clock speeds.
- The fan slider should be set to off like mine, which is Auto.
- Radeon Settings does not allow voltage adjustments, which might limit higher overclocks, see below.
Afterburner
- Launch Afterburner and enter the settings using the button at the bottom.
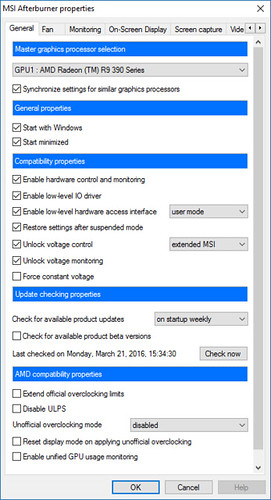
- Match the settings in the first tab with these below. Feel free to explore the other settings, but I won't dive into them really. Click to expand.
- If you want to, the far right tab has the User Interface. In the dropdown you can change the skin. I'm using MSI Cyborg if you want to match to make things easier to follow.
- You'll notice in the bottom left on this skin there's a Windows logo underneath the word Startup. Make sure this is highlighted so that your overclock is applied on boot.
- Under the right dial you'll see 5 profiles. When you've applied clock speeds that you want to save, press the floppy button and then a profile number. Clicking the number again loads it. I'd suggest settings a profile to your stock clocks.
- The 3 buttons in the middle open up Settings, Reset, and Accept.
- The sliders can be adjusted with the keyboard or simply click on the number, type in what you want, and hit enter. You must press apply after changing values to take effect.
- Leave fan on Auto unless you want to set a custom fan curve.
- Press Reset before you begin to make sure you're starting from stock. My card resets to +19 core voltage, so don't be surprised if it's different than 0.
Conveniently, Afterburner and Radeon Settings cooperate pretty well and will reflect each other's changes. I'll primarily be using Afterburner here.
Turning it Up
This is Radeon Settings and Afterburner at full load while running Furmark.
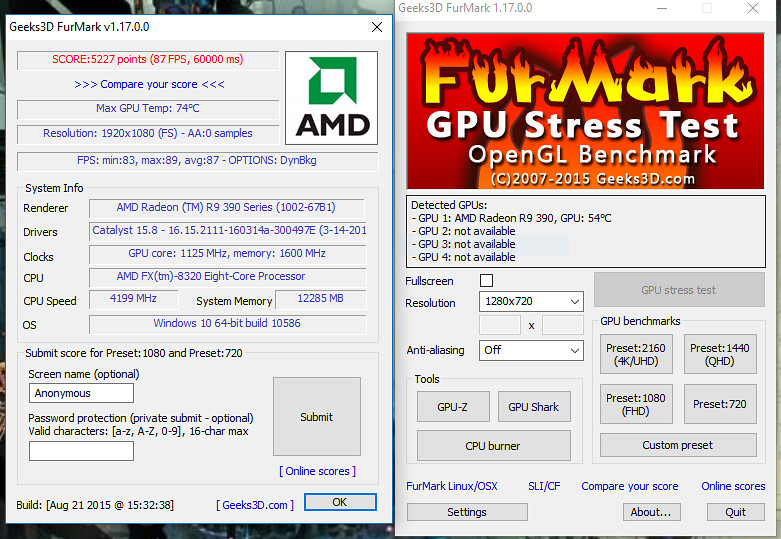
When overclocking the ultimate goal is to get the maximum core clock speed and memory clock speed possible without causing artifacts or instability and keeping temperatures in check. This is a pretty straightforward process of adjusting and testing. Make sure you have Furmark and Valley Benchmark installed from above. It would also be a good idea to do some research into what other overclocks people are getting on their cards so you know what to expect with yours. Different manufacturer's card will clock differently also, even for two 390's for example. Each card is different in its own right and some naturally clock better than others. Also, research the max temperature for your specific card. The 390's are able to get pretty hot, supposedly safe up to 90oC before they start throttling. However I prefer to keep it below that, with 85oC the max I'll go and preferably under 80oC. I never broke 77oC in my testing.I would suggest opening up Excel or similar and creating a table with your Core Clock, Memory Clock, Furmark Score, Max Temperature during bench, and any voltage adjustments. This will allow you to see the performance increases as you overclock. Furmark gives you a score and max temp with each run.
Core Clock
- We'll increase core clock speed first by 10MHz increments. Some will jump by 20MHz at a time or even more. When I'm familiar with a card I'll sometimes do that initially but for beginner's I'll keep it safe at 10MHz.
- Bump up the clock speed, apply it, and fire up Furmark.
- Run a preset 1080p GPU benchmark.
- Keep an eye on your temperatures, shown within Furmark. Also watch the furry donut in the middle. If you start to see black squares or weird graphics glitches, that means your overclock is unstable.
- Keep bumping core clock and running Furmark with each bump while recording your scores. If your card starts running too hot, your score starts dropping or levels off, or you get artifacts, stop.
- Once you've started to get artifacts, diminishing scores or max out your temp, go back 10-20MHz.
- Run again at this speed and see if it remains stable. If it does, you can run the GPU stress test and see if artifacts show up after longer or your temps get too high.
- If you reach a point where you have artifacts or decreasing score but still have temperature headroom, you can try adjusting voltage. Voltage bumps will dramatically increase your temperatures, so be careful with this. Overvolting your card can also destroy it if done improperly. Do bumps of +5mV and test again.
- Once you have to start overvolting, you won't usually get a lot of gains in performance so feel free to stop here and call it good. I was able to stay stable at 1125 with no voltage bumps. 1150 and up to +50mV and I still got artifacts. You'll usually hit a wall pretty quickly at this stage.
- At this point it's a balancing act of temperatures, stability, and increases in score. If you stop getting any score increases and voltage doesn't help or you're too hot, you're probably at your limit.
- Generally I like to reach the limit of what's supposedly a "pass", and then knock it down a notch or two. Performance gains from 10-20MHz are almost non existent and I'll take the lower temperatures and improved stability.
Memory Clock
- Memory clock has usually less noticeable performance increase, I saw almost no Furmark score changes.
- In the same fashion as the core clock, start bumping it bit by bit and testing.
- Once you start having artifacts, instability, or high temperatures back it down 10-20MHz and stress. I wouldn't mess with your voltage at this point, but if you feel adventerous experiment away.
Now that you've got your clock speeds up there, a good long stress is a good idea. Furmark will get your card WAY hotter than it would in normal games, but provides a good stability test. It can take multiple hours of gaming before artifacts show up, so test thoroughly. I like to run 5-10 minutes of Furmark stress test and then two runs of Valley. Feel free to try other benches too. If your temperatures are good and you have no artifacts, you're probably stable. Some people like to stress for hours but unless you're pushing really high clocks this probably isn't needed.
I also find it worthwhile to run a Valley bench set at stock clocks and set at your final overclock and divide the scores to get your percentage in performance gained. Same with Furmark or any other benchmark. I reached a 15% increase in score in Furmark from stock 390 speeds, while Valley increased by about 8%.
Final Notes
- Overclocking can be very time consuming if you're trying to squeeze every ounce out of your card.
- As long as your temperatures and voltages are reasonable, experiment carefully. Sometimes lower memory clock speeds or even voltages will get higher benchmarks. Finding the sweet spot in speeds is half the fun. Recording everything makes this easier
- Keep an eye on your temperatures and card overall as you test it out. While it likely will run hotter, most GPU's can handle a slight to moderate overclock out of the box. Enjoy what you can get, but don't be upset if your card doesn't clock well. All in all your performance gains still aren't huge.
This thread also will serve as a general discussion thread of AMD's graphics cards so feel free to post your overclock results or anything really. I know there isn't as much AMD presence these days.
Last edited:


